Machine Connectivity | 14 Juli 2020
How to Connect to an OPC UA Server
Prerequisites
This guide is to help you connect to an OPC UA server, using Connectware. It assumes that you understand the fundamental Connectware concepts. For that you can check out the Technical Overview. To follow the example, you should have a Connectware instance running. If you don’t have that, learn How to install the Connectware. Although we focus on OPC UA here, you should also be familiar with MQTT. If in doubt, head over to MQTT Basics.
Introduction
You will learn to integrate OPC UA servers into your Connectware use case. Everything you need to get started will be covered in the following topics:
- Browsing the OPC UA address space
- Identifying OPC UA datapoints
- Mapping OPC UA data to MQTT
- Verifying data in the Connectware Explorer
Service YAMLs used in this lesson are available on GitHub.
Selecting the Tools
OPC UA Server
Our example utilizes the OPC UA server at opcuaserver.com, because it is publicly available. You can of course bring your own device instead.
OPC UA Browser
This guide recommends using FreeOpcUa’s Simple OPC UA GUI client for exploration. It is open source and offers convenient installation on Windows, Linux and Mac. If you prefer working on the terminal, go for Etienne Rossignon’s opcua-commander. If you have another option available, you may as well stick to it.
Exploring the OPC UA Address Space
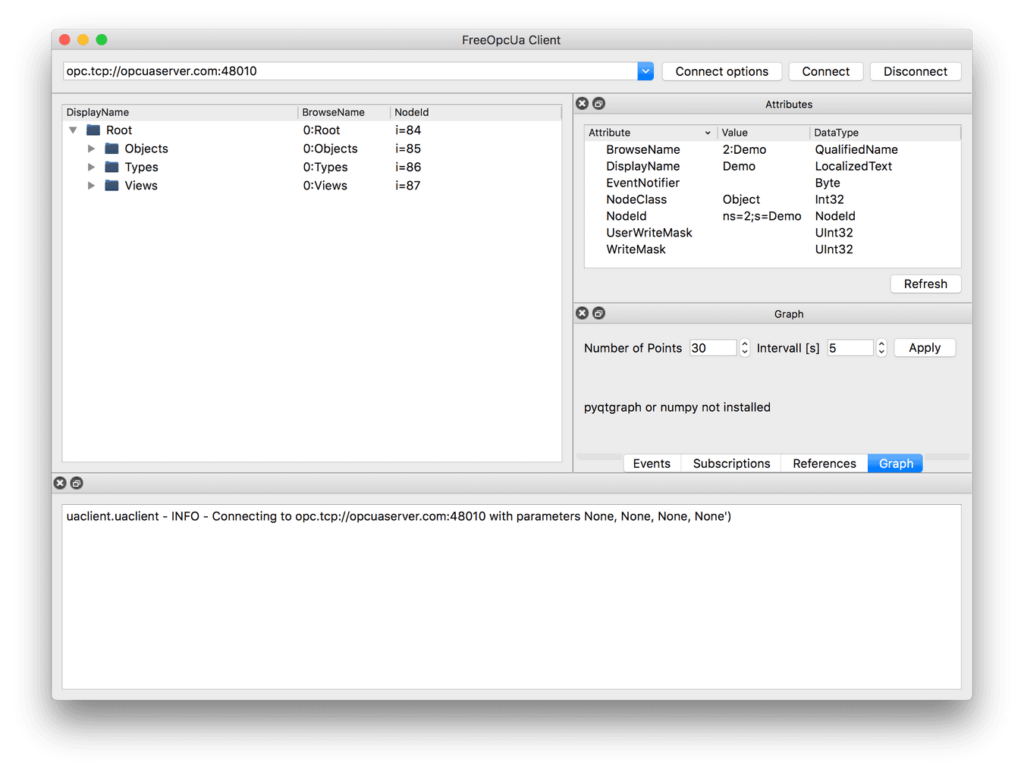
Let’s get started! Launch your OPC UA browser and connect to the endpoint opc.tcp://opcuaserver.com:48010 (or whatever endpoint applies to the device you brought). Tada! – the three root nodes Objects, Types, and Views should show up.
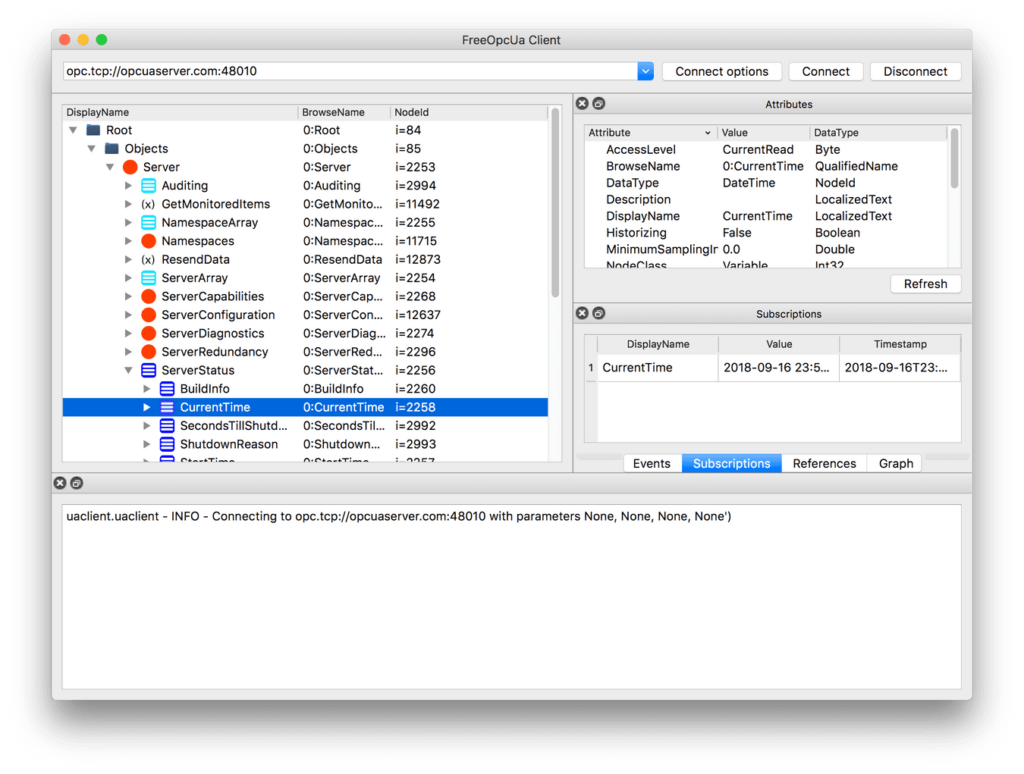
Selecting Datasource Nodes
Explore and find the node which is displayed as CurrentTime. Select it and take a look at the Attributes pane – according to the NodeClass attribute we are dealing with a Variable which, by specification, contains a Value attribute. Variable nodes allow us to read and write data, depending on the AccessLevel attribute.
Right click on CurrentTime and select subscribe to data change. The Subscriptions pane then shows the actual value and it is updating at a fast rate.
Now we know that Variable nodes in the OPC UA address space are the datasources, but how to make use of them with Connectware? There are two ways to reference them:
- By
NodeId, which is a node’s unique identifier. For example, theCurrentTimevariable’sNodeIdisi=2258. - By
BrowsePath, which is the path ofBrowseNamewhen you navigate the treeview. For example, theCurrentTimevariable’sBrowsePathassembles to/0:Objects/0:Server/0:ServerStatus/0:CurrentTime.
Both approaches have their pros and cons. In general, the NodeId is less clumsy, but less descriptive. In this example, we prefer the NodeId and recreate the tree structure semantics with the help of MQTT mappings.
Below, there is a table of variables to use in the example. Most variables are read-only, except for the Temperature Setpoint, which allows us to actually control something.
|Variable             |NodeId                                      |BrowsePath                                                               |AccessLevel              |
|–––––––––––––––––––––|––––––––––––––––––––––––––––––––––––––––––––|–––––––––––––––––––––––––––––––––––––––––––––––––––––––––––––––––––––––––|–––––––––––––––––––––––––|
|CurrentTime          |i=2258                                      |/0:Objects/0:Server/0:ServerStatus/0:CurrentTime                         |CurrentRead              |
|Humidity             |ns=3;s=AirConditioner_1.Humidity            |/0:Objects/3:BuildingAutomation/3:AirConditioner_1/3:Humidity            |CurrentRead              |
|Power Consumption    |ns=3;s=AirConditioner_1.PowerConsumption    |/0:Objects/3:BuildingAutomation/3:AirConditioner_1/3:PowerConsumption    |CurrentRead              |
|Temperature          |ns=3;s=AirConditioner_1.Temperature         |/0:Objects/3:BuildingAutomation/3:AirConditioner_1/3:Temperature         |CurrentRead              |
|Temperature Setpoint |ns=3;s=AirConditioner_1.TemperatureSetPoint |/0:Objects/3:BuildingAutomation/3:AirConditioner_1/3:TemperatureSetPoint |CurrentRead, CurrentWrite|
Code-Sprache: YAML (yaml)
Writing the Service YAML
The Service YAML is used to specify connections, endpoints and mappings for Connectware to handle. Create a new file in a text editor, e.g. opcua-example-service.yml. This example adds minimal content, to not distract the eye. For a complete reference of properties you can check out the Structure of the commissioning file.
Description and Metadata
These contain some general information. You can give a short description and add a stack of metadata. Regarding the metadata, only the name is required while the rest is optional. We will just use the following set of information for this lesson:
description: >
 OPC UA Example Service
 Cybus Knowledge Base - How to connect an OPC UA server

metadata:
 name: OPC UA Example Service
Code-Sprache: YAML (yaml)
Parameters
Parameters can be adjusted in the Connectware Web UI. We are defining the address details of our OPC UA server as parameters, so they are used as default, but can be customized in case we want to connect to a different server.
parameters:

 opcuaHost:
   type: string
   description: OPC UA Host Address
   default: opcuaserver.com

 opcuaPort:
   type: integer
   description: OPC UA Host Port
   default: 48010
Code-Sprache: YAML (yaml)
Resources
The first resource we need is a connection to the OPC UA server.
Cybus::Connection
opcuaConnection:
   type: Cybus::Connection
   properties:
     protocol: Opcua
     connection:
       host: !ref opcuaHost
       port: !ref opcuaPort
       #username: myUsername
       #password: myPassword
Code-Sprache: YAML (yaml)
If you are using a username and password, you could also create parameters, to make them configurable. In our case the server does not require credentials.
Cybus::Endpoint
  currentTime:
   type: Cybus::Endpoint
   properties:
     protocol: Opcua
     connection: !ref opcuaConnection
     topic: server/status/currenttime
     subscribe:
       nodeId: i=2258


 Humidity:
   type: Cybus::Endpoint
   properties:
     protocol: Opcua
     connection: !ref opcuaConnection
     topic: building-automation/airconditioner/1/humidity
     subscribe:
       nodeId: ns=3;s=AirConditioner_1.Humidity
       #browsePath: /0:Objects/3:BuildingAutomation/3:AirConditioner_1/3:Humidity

 PowerConsumption:
   type: Cybus::Endpoint
   properties:
     protocol: Opcua
     connection: !ref opcuaConnection
     topic: building-automation/airconditioner/1/power-consumption
     subscribe:
       nodeId: ns=3;s=AirConditioner_1.PowerConsumption

 Temperature:
   type: Cybus::Endpoint
   properties:
     protocol: Opcua
     connection: !ref opcuaConnection
     topic: building-automation/airconditioner/1/temperature
     subscribe:
       nodeId: ns=3;s=AirConditioner_1.Temperature

 TemperatureSetpointSub:
   type: Cybus::Endpoint
   properties:
     protocol: Opcua
     connection: !ref opcuaConnection
     topic: building-automation/airconditioner/1/temperature-setpoint
     subscribe:
       nodeId: ns=3;s=AirConditioner_1.TemperatureSetPoint


 TemperatureSetpointWrite:
   type: Cybus::Endpoint
   properties:
     protocol: Opcua
     connection: !ref opcuaConnection
     topic: building-automation/airconditioner/1/temperature-setpoint
     write:
       nodeId: ns=3;s=AirConditioner_1.TemperatureSetPoint
       #browsePath: /0:Objects/3:BuildingAutomation/3:AirConditioner_1/3:TemperatureSetPoint
Code-Sprache: YAML (yaml)
Installing the Service YAML
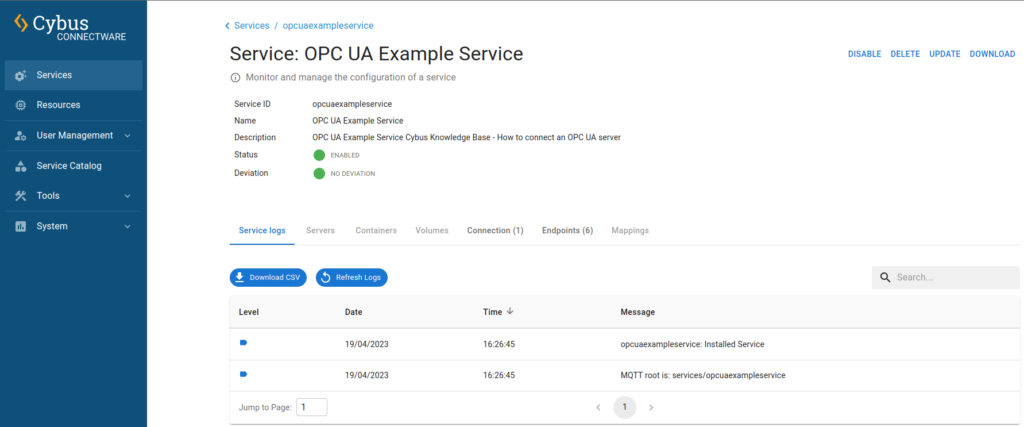
Head over to the Services tab in the Connectware Admin UI to install the Service YAML. You will be asked to provide parameters or confirm the default values. After enabling this Service you are good to go on and see if everything works out!
Verifying the Data
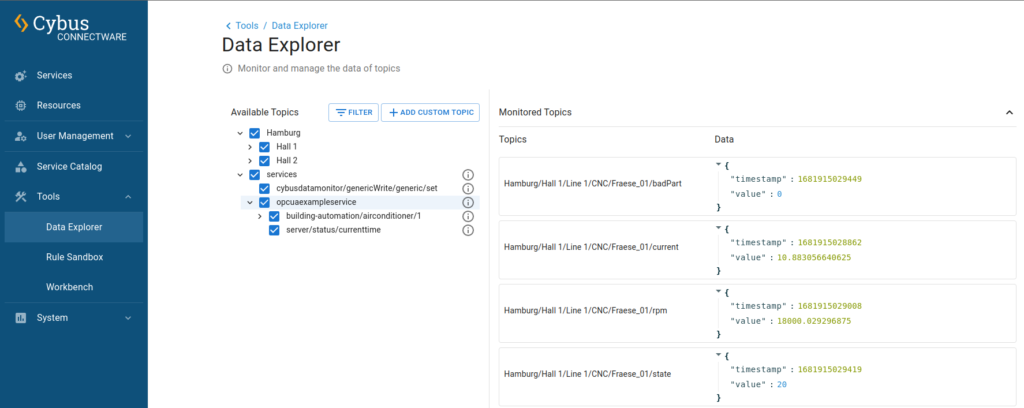
Go to the Tools tab and navigate to Data Explorer tab. Select entries in the tree view – this activates the live view and you should see data coming in.
Summary
First, we used an OPC UA client application to browse the address space. This allowed us to pick the variables of our interest and to reference them by their NodeId, or by BrowsePath. Given that information, we created a Service YAML and installed the Service on the Connectware. In the Explorer we finally saw the live data on corresponding MQTT topics and are now ready to go further with our OPC UA integration.
Where to Go from Here
Why not store the OPC UA data in a time series database and display it on a dashboard for instance?